Show and Shell

I found this little dresser on Kijiji. It was advertised as free and was only 10 minutes away. I emailed right away after it posted but, when I heard back from the girl, she upped the price to $10. Uh...okay...I told her I'd still come to check it out and if I liked it I would pay the $10.

When I got there it turned out to be a girl from my mom group. I haven't actually talked to her much but I still felt like I had to buy it since I knew her.


It wasn't in too bad of shape, there's a chunk missing from the corner of one the drawers but that just adds character, right? The knobs had to go, they didn't match and there was one missing. I still had 6 oversized wooden knobs from the ReStore waiting for a 3 drawer dresser.


It didn't need much in terms of preparation so I quickly got to painting. It got a couple coats of the same off-white that I've been working with for a few dressers. That gallon has been lasting forever!

Then it sat...and sat....and sat. I was waiting for inspiration. It was almost exactly the same as the antique dresser I did but it didn't have a mirror.


I realized it's the perfect height for a change table so I went with that idea. I tried to make it bright, fun and gender neutral, I really like the way the colours turned out!


Party on, Wayne

Piece of Work Wednesdays at Primitive & Proper

Furniture Feature Fridays


Alphablue Dresser

This is a dresser that I picked up at Goodwill for $5.


By the time I came back with a salesperson to put a sold sticker on it there was someone else looking at it. I kinda felt bad but those are the breaks on 50% day! You gotta be stealthy, like a ninja.

Since I usually do dressers more geared towards little girls I thought it was time to do a dresser for a little boy. So I used the Benjamin Moores, Montpelier that I picked up in the oops section.


I gave the dresser a really good sand (since it had a really thick, super shiny, bad stain job on it) followed by the usual prime & paint. After I painted I was left with a beautiful blank blue/gray canvas. Hmmmm. I really went back and forth on what to paint on the dresser. Numbers, letters, elephants, robots? The possibilities were endless! I was thisclose to doing elephants but, in the end, the alphabet won out. I just thought it would appeal to more people.


I re-used the handles that came on the antique dresser. They're not very pretty but they're masculine and I thought the brushed nickel would look nice with the paint colour.


For the letters I used my super high-tech method of tracing the letters right from my computer screen (because I don't want to waste toner) onto paper and then cutting out the letters and then tracing them onto the dresser. I then painted in the letters with a small brush using acrylic paint.


Hopefully it finds a home in some little guys room.

**** Please enter to win giveaway in my previous post****

Linking with:

giveaways
Photobucket

More Paint & Paper

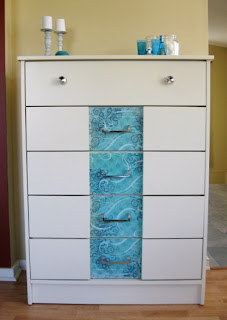
This is the dresser that I came to own quite interestingly,if anyone remembers. After I got it home it needed a good cleaning, followed by a good sanding.


After I sanded I put the drawers back and noticed something else that was...um... interesting. Does anyone else see it? Look closely.


Look at the fourth drawer. Doesn't exactly fit, does it? I had to go back and look at the first picture I took before I took out the drawers. I was sure I would have noticed something like that. But sure enough, the bottom drawer (in the top pic) is too short on each side.

Huh. What the heck? How does that even happen? The only thing I can think of is that this drawer is out of the matching 9 drawer dresser that I didn't buy. But that would mean that the 9 drawer dresser now has a drawer that is too big. Oops.

Anyway, at first I figured I would just paint it up and maybe someone won't notice just like I didn't notice. Then I had one of those Aha Moments that Oprah is always talking about. If I could pry off that wood on top of the drawers and then move it over half an inch it would line up with the other drawers. Luckily it wasn't glued down, only a few nails stood between me and 5 perfectly lined up drawers.

I had already painted before I had the Aha Moment so you can see where I moved over those pieces. At this point I'm thinking "why the heck are these pieces on the drawers anyways?"


I planned on doing some podging in the recessed parts anyways so it didn't matter that there was no paint where I moved the wood over. I picked up the paper at Michaels and got to work podging. I'm basically in love with Mod Podge now.


I bought two new knobs for the top drawer since the original ones were broken. Not the typical knobs I would buy but the finish matched the original handles which I planned on re-using. I did, however, remove the plate that was behind the handles to make them look more updated.

This dresser turned out to be a bit more labour intensive than most dressers but who doesn't like busting out the tools, getting inventive and hammering a few nails?



Party on, Wayne!


Visit thecsiproject.com

Homemade Wooden Crate

The challenge this week at The CSI Project is "Pottery Barn Inspired". Since I've only ever been into a Pottery Barn one quick time (did you just gasp?) I didn't really know what that challenge meant. Actually, the first I had heard about Pottery Barn was that episode of Friends where Rachel tricks Phoebe into thinking she bought everything at a flea market. Anyone remember that one?

I hopped onto to their website to see what's what. Since shipping to Canada is pretty astronomical with most US companies I usually don't tease myself with such things. A quick look on their website says shipping to Canada is not even an option.

While drooling over the site I think I lost sensation in my eyeballs. Seriously some gorgeous stuff. I just love the soft, warm, natural colours with the rustic elements thrown in.

Like this room. Beautiful. I want to take a nap there.


Image: Pottery Barn

Then I saw this picture and I thought the little crate would be perfect to hold my phonebooks and cookbooks which are currently in a messy pile on the counter in the kitchen.


Image: Pottery Barn

I had some thin sheets of mahogany from a previous project that I thought would work well for this one. I measured the widest book I had to make sure everything would fit and then just made the measurements of the crate from there. After I dragged the table saw up from the basement and outside (by myself!) I cut out 4 panels that were 3"x9" and 8 panels that were 4"x11". I sanded all the edges then beat up the wood a bit with a hammer and a screwdriver so they weren't so perfect.


I used a combination of little nails and wood glue to put it together and then added little upholstery tacks to add a little character to it.


I first stained the wood with some Minwax Red Oak stain that I had on hand. Then I added Ellrose Dairy Co. to the front which was the name of my Grandpa's dairy farm. After the letters dried I sanded the letters to distress them a bit. Then I took some Minwax Ebony stain that I had and lightly rubbed some over the Red Oak and the letters to tone it down and a little darker around the corners.


A totally free project that helps me control my clutter!


Linking with:
Visit thecsiproject.comThe Girl Creative

Photobucket

Twice as Nice

I was stalking Kijiji (my favorite new pastime) when I saw this little pair of nightstands for $20. I immediately emailed about them and saw they were located nearby too! I was in the car going to pick them within half an hour.
The woman also had this dresser which she let me have for $5. I really love the shape of these old pieces and that they are solid wood.


I gave them a good sand everywhere (especially since one of them had nail polish spilled on the top) then I primed and sprayed them. Unfortunately, I'm still working on the same gallon of cream paint since I haven't found any more cans of oops paint that I like.

I've been wanting to do a little mod podging for a while and thought this was the perfect project for it. I picked up this Amy Butler scrapbook paper pad at Michaels. It has some really pretty florals and prints, perfect for these dainty little nightstands.


After I finally decided on which paper to use (it was such a hard decision!) I applied it to the drawer fronts and drawer bottoms. I really love the look of the paper I don't know why I waited so long to use Mod Podge. It was much easier than expected! Thanks to Lenore at Lather.Write.Repeat for some tips and inspiration for these nightstands.


I also primed and spraypainted the knobs with Tremclad metal primer and Tremclad hammered finish spraypaint.

I kinda want to keep these for my little girls room but I think I will let them go. But they really are my favorite so far!


'cause I like to party:

giveaways
Furniture Feature Fridays

Visit thecsiproject.com